This is Part 3 of a 3 part series, for part 1 click here, for part 2 click here.
Good News!
This part is probably the most fun part of the entire process. This is where you get to see all the little effects come together, and even start throwing some text and forests on there as well.
Bad News!
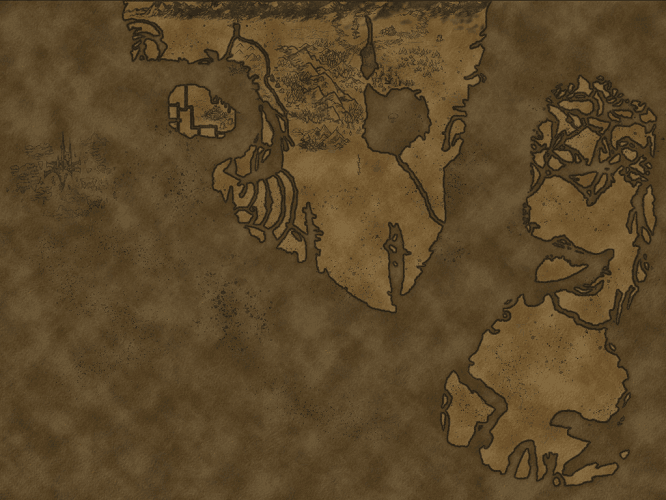
The process of weathering a map is VERY determinate on what you want your own personal map to look like. Due to this, I have only provided one image: My final product. My goal here is for you to learn and experiment with Photoshop, not for you to copy me.
So without further ado, let’s dive in…
Step 1: In your layers tab, hit the folder icon at the bottom and create a new group. We’ll be working inside this group for now.
Go to your black and white background layer (The layer, not the alpha channel) and do a magic wand selection in the black area > select > similar.
1.1: With black as your foreground color, go to Edit > Stroke > Width of 3pix > Location:Inside > OK. Then Ctrl+H to hide selection > Filter > Blur > Gaussian Blur > Radius around 15. If you have only your B&W layer selected, you’ll notice it has gained a kind of ‘glowy’ look. This is good.
Step 2: Create New Layer > Make sure Back and Foreground are Black and White > Create Difference Clouds. Set this as the top layer, and opacity to about 20%. This will be the start of our weathering effects. Go to Image > Adjustments > Curves and mess with that until you find something you like.
Step 3: Repeat step 2, but this time add the Difference Clouds layer about 6 or 7 times and set the opacity to about 10%. On this layer, Image > Adjust > Invert > Blend – Color Burn.
Step 4: New Layer > Select All > Stroke of a dark brown, about 40 to 50 pixels > Filter > Blur > Guassian Blue > Radius = 80 > Blend = Multiply > Opacity = 60%. This will add a viginette effect. If you don’t like viginette, don’t use this.
Step 5: You can add some further weathering effects by adding a paper texture from any JPEG or PNG gotten off Google Images. Simply create a new layer, add in the image as a new layer, and drop the opacity down to whatever percent that looks right to you, it depends on the paper texture you’ve chosen.
Step 6: Details. Details can be added via brush effects that you can import to your PS brushes from certain sets that can be found online. These can be used to add mountains/forests and any other structures you wish to add. The ones I’m using come from a paid pack, but this pack is a very popular free download.
Step 7: Text. Use Photoshop’s text tool for this. Research other maps made using the same style, maybe download a few fantasy fonts. Notice maps like these tend to use different fonts for town names versus names of land regions.
My Final Map! (Note: I don’t use text)
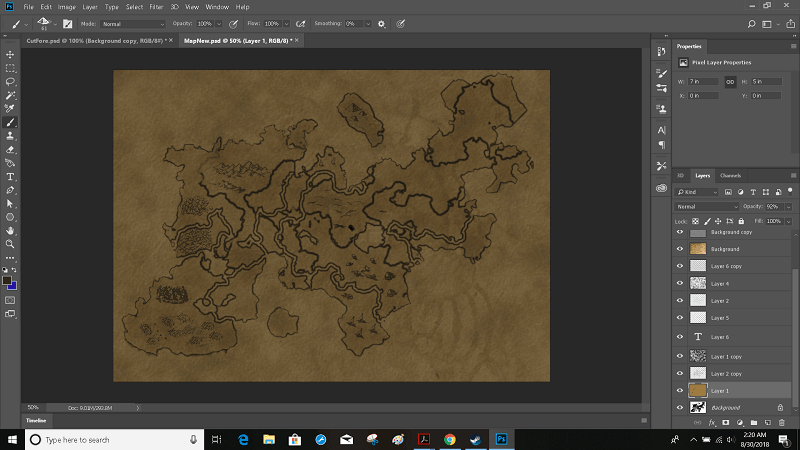
This is pretty much the final step! A few notes: This is the second map I have ever created. I learned this skill through the Cartographer’s Guild, and there are plenty more advanced tutorials over there. It’s the place to be if you’re looking to improve your skill.
In fact, much of this tutorial is an updated version of tutorials already on that site, with a bunch of changes so they fit more in line with PS2018.
If you’re thinking of printing your maps, consider upping resolutions when you make a new file. There’s not much of a disadvantage to it, and your maps will look better if you decide to scale them up. But if you’re printing larger-scale maps, you’ll probably want to look into putting more time and detail into them as well.
Have fun!

